Plyometrics Jump Training
Plyometrics jump training is THE best way to increase your vertical jump, bar none. After reading this you'll know how to measure your progress, considerations for being safe while exercising, and you'll even have a basic plyometric workout.
Weight training is one of the best methods of strength training! If you want to start weight training safely and effectively, with the best info, diet, and routines, check out the 5 Day Beginner Weight Training Course!
Let's go!

First, 2 Tests
1. Can you parallel-squat (down to thighs parallel to the floor position) 60% of your body weight 5 times in 5 seconds?
2. Is your 1 RM parallel-squat at-least 1.5 times your body weight?
If you can do both of those, then you're in good enough shape to start worrying about plyometrics. Otherwise, STOP: you'll just hurt yourself. You need to build strength, probably with weight training, first.
Hurting yourself does you no good, so don't do it. Be smart, and take to time to build up to this plyometrics jump training material the right way.
Charting Your Plyometrics Jump Training Progress
1. Standing Jump-and-Reach
- Stand next to a wall and, reaching as high as you can up it, make a mark on the wall.
- From a feet-together position, jump upward as high as possible and mark with your hand the height.
- Measure the distance between the two marks: that's your jump height.
2. Jumping From a Box
- From an 18-inch box, drop to the floor and then immediately jump up as high as possible (a depth jump). Make a mark on the wall as high as you can.
- Measure the distance from your initial standing mark to the new jumping-from-the-box-mark. That's another measure of your jump height.
3. 3-Step Vertical Jump
- Take 3 steps and on the third (which should be on your preferred foot) jump up and mark as high as you can on the wall.
- Measure the distance from your initial standing mark to the new 3-step vertical jump mark. That's another measure of your jump height.
OK, now you've got some baseline information to start from. You'll know if your workouts help, hurt, or do nothing for your vertical jump.
Considerations for the Routine
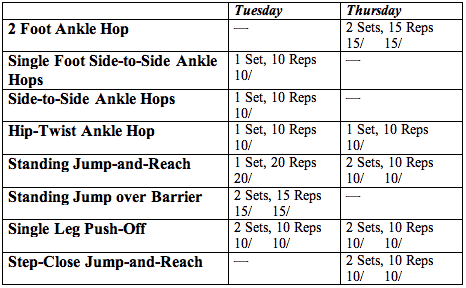
This routine is designed for a beginner in the off-season, someone who hasn't done plyometric workouts or plyometrics jump training before but who has done weight training.
There're only 60 to 100 reps for the entire workout. More intermediate or advanced athletes should be doing 100 to 150 and 120 to 200 reps, respectively.
Again, this is for someone just starting on their quest for a higher vertical jump. Also, the plyometrics jump training is organized only for Tuesdays and Thursdays, so that along with weight training the entire weekly workout isn't too demanding.
Plyometrics Jump Training Routine
As always, start slowly. Little gains are better than injuries, always.

- Plyometrics Jump Training Exercises -
2-Foot Ankle Hop
Equipment: None.
Start standing straight up, feet at shoulder width, hands relaxed and hanging at your sides.
- Using only your ankles (and calf muscles), hop repeatedly in place. Make sure to extend your feet and flex your ankles fully with each jump.
- Hold your arms in front of you as you hop, lifting them slightly when you jump up.
Single Foot Side-to-Side Ankle Hops
Equipment: Two marks on the ground (cones, tape X's, etc.) 3 to 4 feet apart.
Begin by standing on one leg next to one of the marks on the ground, feet at shoulder width and your arms relaxed, hanging at your sides.
- Hop back and forth between the marks on the floor, landing on your right foot near the right mark and you left foot next to the left mark.
Side-to-Side Ankle Hop
Equipment: None.
Start standing straight up, feet at shoulder width, hands relaxed and hanging at your sides.
- Using only the flexion in your ankles, hop 2 to 3 feet to one side, keeping your feet at shoulder width.
- As soon as you land, jump back. Hold your hands up at chest altitude, arms bent at the elbows.
Hip-Twist Ankle Hop
Equipment: None.
Start standing straight up, feet at shoulder width, hands relaxed and hanging at your sides.
- Hop up into the air and twist, moving from the hips, and turn your lower body 90 degrees one side.
- Then, hop up and turn you lower body forward. Then, hop again and turn your lower body 90 degrees to the other side, and then straight forward again.
- That's 1 repetition.
The upper body doesn't turn in this exercise — the movement only comes from the hips and legs.
Standing Jump-and-Reach
Equipment: A wall or hanging object.
Begin by standing straight, feet at shoulder width and arms relaxed at your sides.
- Squat slightly and then jump upward as high as you can. Extend your arms up above your head to try to grab the object, or mark as high as you've jumped on the wall.
- Repeat.
Standing Jump Over Barrier or Obstacle
Equipment: A cone, low hurdle, or other object 12 to 24 inches high.
Begin by standing straight, feet at shoulder width and arms relaxed at your sides.
- Bending slightly at the hips, jump over the obstacle. Keep your body upright and tuck your knees up and together, toward your chest, to clear the obstacle.
- Land, turn around, and jump over the obstacle again.
Single Leg Push-Off
Equipment: A 6- to 12-inch high box.
Begin by standing straight, one foot on the box and one foot on the ground, with your arms relaxed at your sides.
- Push off with the foot on the box and extend that leg to jump upward into the air as high as possible. Swing your arms with your jump to increase your momentum and height.
- Land with the same feet on the box and floor, respectively.
Step-Close Jump-and-Reach
Equipment: Something to reach for.
Begin by standing straight, one foot (your preferred foot) forward and one foot back, with your arms relaxed at your sides.
- Step forward with your forward (preferred) foot, and then slide your rear foot up even with your forward foot and immediately jump straight up into the air, reaching for the suspended object.
Going For It...
If you are serious about continuing your plyometrics training to any extent, consider buying Jumping Into Plyometrics by Donald A. Chu. This awesome book is THE book to buy if you want to jump higher or know more about plyometrics training. It's also the source from which I drew most of the information to write this page.
You've got the info and the guts to do this training and increase your vertical jump. All you have to do now is get out there and do your plyometrics jump training!
Oh, and be sure to sign up for the e-zine Starting Strong to get monthly strength training, exercise, and diet tips e-mailed to you - and access to the free e-book Train Smart, Eat Smart: Exercise Nutrition Hacks!
• Click here to learn more about Plyometrics!
OR
• Click HERE to leave 'Plyometrics Jump Training' & go back to the Home-page!
References:
Chu, Donald A. 1998. Jumping Into Plyometrics. Champaign, IL: Human Kinetics.
Search CST...
|
Tweet Follow @Aaron_CST |
|
"About 2 weeks ago I read all the ab strengthening stuff on your site because I decided I wanted to be strong, instead of having a lot of belly fat. So I started eating healthier, running, exercising, you name it - everything your site said to do to help. Now I am noticing a real difference! Thank you for making this. :D xD" ~ Julia |
|
[This calorie calculator is] the most useful tool on the web that I can find… Also, I compared the calories calculated by your calculator to the calories calculated by the treadmill at my gym, and they're within a couple calories of each other, so yours is as accurate as we're going to get. REALLY AWESOME TOOL. I love it and depend on it. Thank you sooooo much for making this available." ~ Galit Sharon Marcus |
|
Thank you very much, I was too lean before 2 years (55 Kgs), after the gym now I'm 72kgs, all the muscles have developed... when someone hand shakes with me it can be squeezed easily, they're making fun of me! ~ Tamil Arasan |


New! Comments
Have your say about what you just read! Leave me a comment in the box below.